For an easier time reading don’t forget that you can view all chapters on the right side of the page by clicking on Show/hide under table of content.
1. Overview
Military operations rely on the position, navigation and timing (PNT) data that GPS can provide. In combat, the accuracy of PNT data can mean the difference between life and death. Non-military GPS receivers simply aren’t good enough when lives are on the line
(Extracted from the real life manual)
Here’s a list of the MicroDAGR’s features (in Arma 3):
- Compass and headings
- Date and hour synced to the mission
- Elevation (above or below sea level)
- Current speed
- GPS with topographic and satellite view
- Creating, naming, deleting waypoints
- Friendly identification (BLUFOR tracker need to be on)
- The MicroDAGR is also able to connect to your vector to retrieve data from it
2. Usage
Please note that the numbers in 2.1 are going to be referred to as 1, 2, etc. … when explaining how to use the MicroDAGR.
The MicroDAGR position on the UI is where your GPS is, you can modify it in Options → Game → Layout.
2.1 Bringing the MicroDAGR
- Self interact Ctrl+⊞ Win.
- Select
Equipment. - Select
configure MicroDAGR.
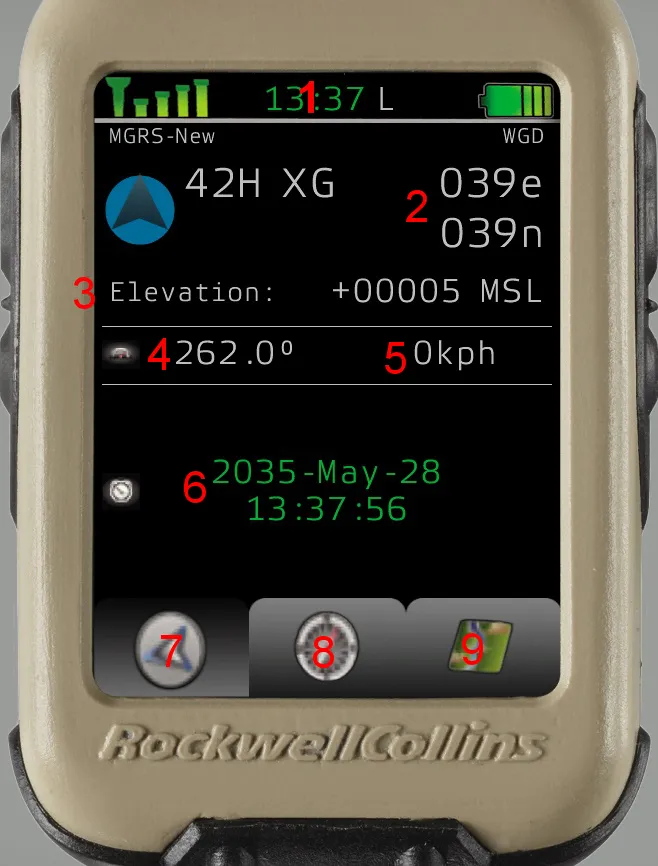
2.2 The MicroDAGR interface
| Number | Function |
|---|---|
1 | Options menu and hour display |
2 | Grid position e is west to east n is south to north |
3 | Elevation above sea level in meters |
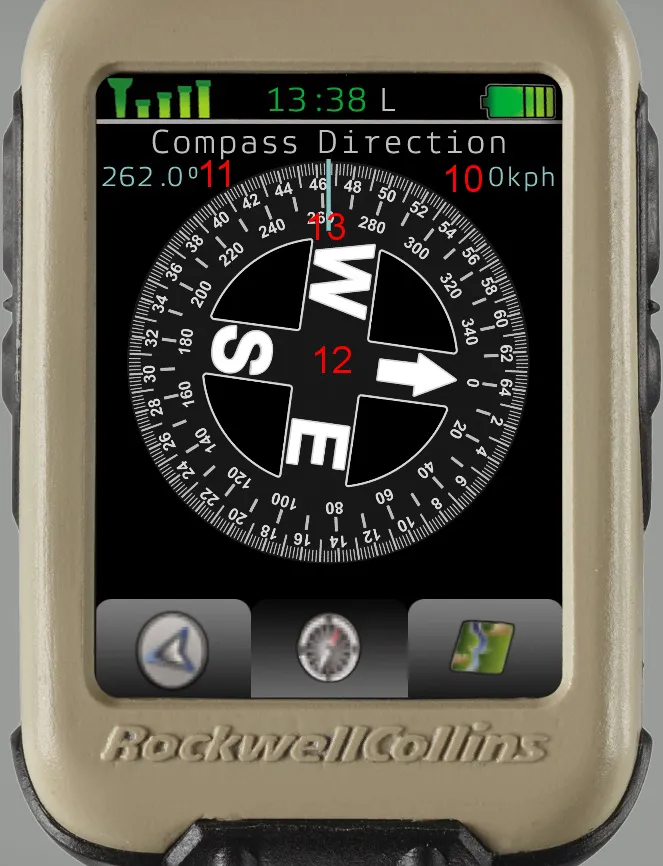
4 & 11 | Compass heading |
5 & 10 | Current speed |
6 | Date (mission) |
7 | Main menu button |
8 | Compass menu button |
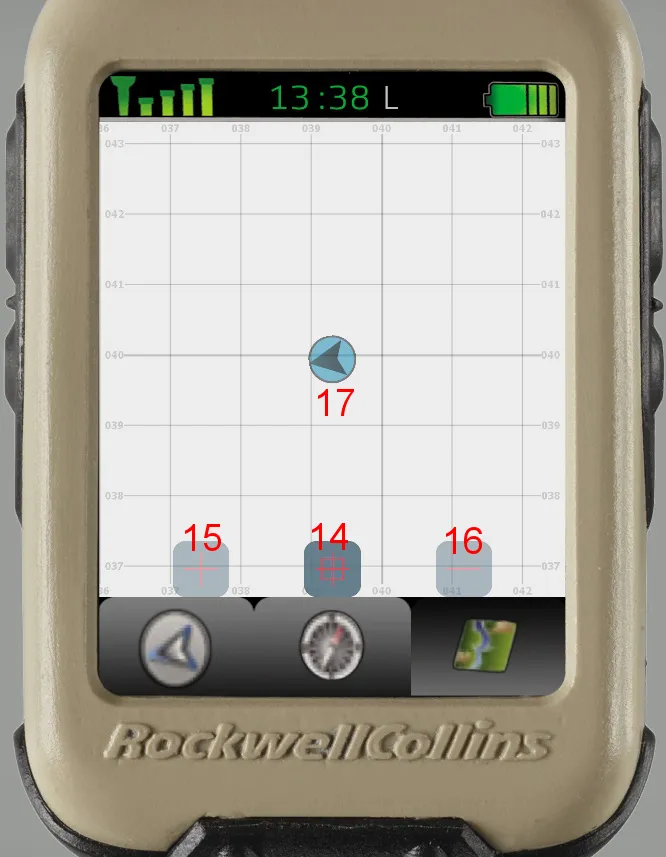
9 | Map menu button |
12 | Compass |
13 | Player heading (your eyes) |
14 | Center the map on your position |
15 | Map zoom |
16 | Map dezoom |
17 | Your position |
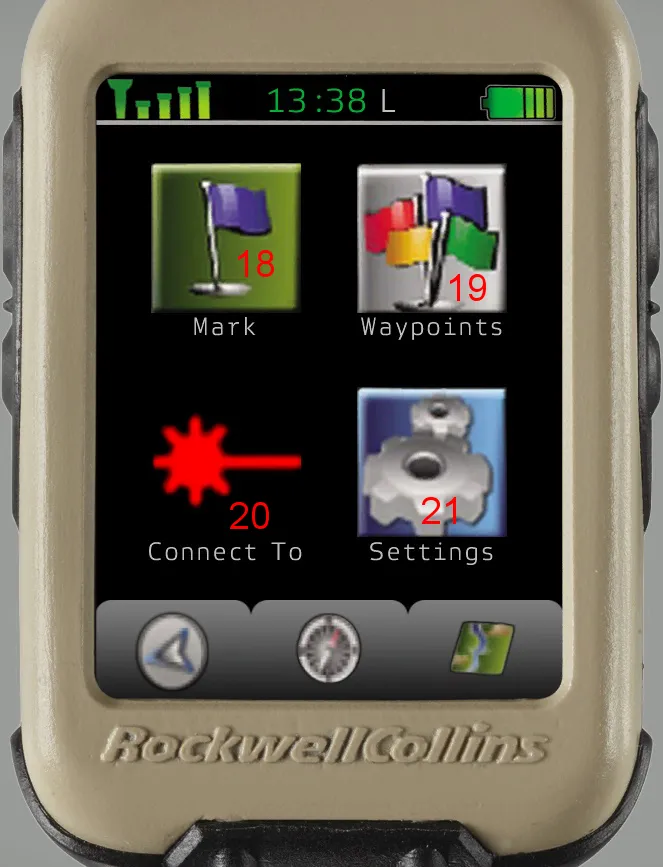
18 | Waypoint creation menu |
19 | Waypoint editing menu |
20 | Connection menu |
21 | Settings menu |
2.3 Waypoints
2.3.1 Adding waypoints
There are three ways of adding a waypoint.
First way: Using the waypoint creation menu.
- Find the position you want to mark on the map.
- Get it’s map grid.
- The grid is composed of 6 digits.
- The first three digits are read west to east. (Top of the map screen).
- The last three are read south to north. (Left side of the map screen).
- Go to the options menu (Click in
1area, above the bar). - Click on
Mark(18). - Enter the grid number.
- Press OK.
- Enter the desired name of the waypoint.
- Press OK.
Second way: Using the waypoint menu
- Find the position you want to mark on the map.
- Get it’s map grid.
- The grid is composed of 6 digits.
- The first three digits are read west to east. (Top of the map screen).
- The last three are read south to north. (Left side of the map screen).
- The grid is composed of 6 digits.
- Go to the options menu (Click in
1area, above the bar). - Click on
Waypoints(19). - Click on
Add. - Enter the grid number.
- Press OK.
- Enter the name of the waypoint.
- Press OK.
Third way: Using the map menu.
- Go to the map menu (click on
9) - Double left click on the position where you want your waypoint.
- Enter the name of the waypoint.
- Press OK.
2.3.2 Setting a waypoint
- Go to the options menu (Click in
1area, above the bar). - CLick on
Waypoints(19). - Select the waypoint.
-
Click on
SetWp. - Once a waypoint is set:
- It’s heading, elevation and distance are marked on the main menu. (
7) - It’s heading, direction, grid position and name are marked in the compass menu (
8) - A marker appear at the waypoint grid location in the map menu (
9)
- It’s heading, elevation and distance are marked on the main menu. (
2.3.3 Deleting a waypoint
- Go to the options menu (Click in
1area, above the bar). - Click on
Waypoints(19). - Select the waypoint.
- Click on
Delete.
2.4 Switching between mils and degrees
- Go to the options menu (Click in
1area, above the bar). - Click on
Settings(21) - Double left click on the unit next to
Angular unit:
2.5 Switching between topographical and satellite view
- Go to the map menu (
9) - Click on the map menu button again (
9)
2.6 Retrieving data from the vector
- For this you need a
Vector 21. - Go to the options menu (Click in
1area, above the bar). - Click on
Connect to(20). - Pull out your
Vector 21.- Press and hold both R and Tab ↹ until the red pointing circle appears.
- Sight the circle on the object and release both keys.
- The data on the main menu now has changed, you can now see the azimuth the range and the elevation of the point you sighted.
- Note that the compass menu also changed and now features the azimuth, compass bearing, distance and grid position of the point you sighted.
Note that the results of the measure you took won’t change until you do an other measure.