1. Overview
1.1 AtragMx from Horus Vision
Horus ATragMX software considers atmospheric conditions, gun data, ammunition, range, speed and muzzle velocity to calculate precise aiming solutions with “come-up” results – and even accounts for Coriolis and spin drift effects. ATragMX, loaded on a handheld computer made by TDS Recon, is easy to use and lightning-fast. The Recon meets the rigorous MIL-STD-810F military standard for drops, vibration, humidity, altitude and extreme temperatures.
2. Requirement
3. Usage
3.1 Opening the AtragMx
3.1.1 Interaction Menu
- Open the self interaction menu Ctrl + ⊞ Win.
- Select
Equipment. - Select
Open AtragMx.
3.1.2 Custom key
OPTIONS/CONTROLS/CONFIGURE ADDONS/ACE3 Equipment
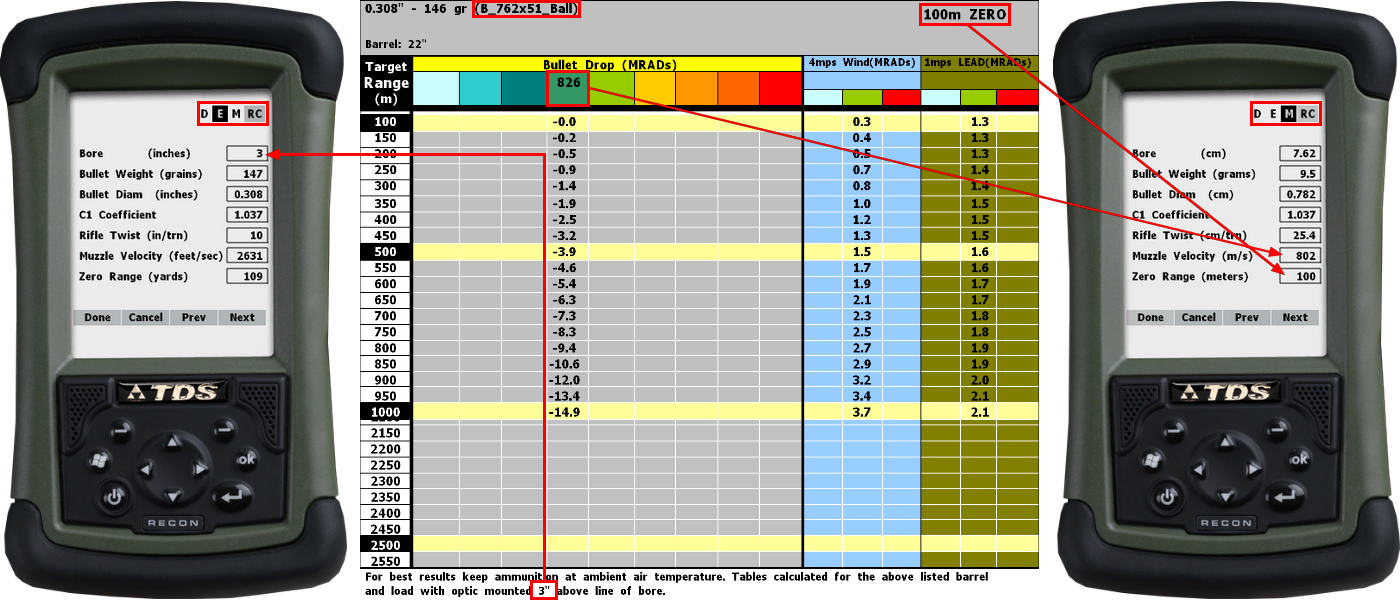
3.2 Example with M14 and default 7.62mm 20Rnd Mag
Start of the mission:
- Open the Range Card and check the ammunition: bullet diameter, bullet weight, rifle twist, muzzle velocity at 15°C, zeroed distance and bore height.
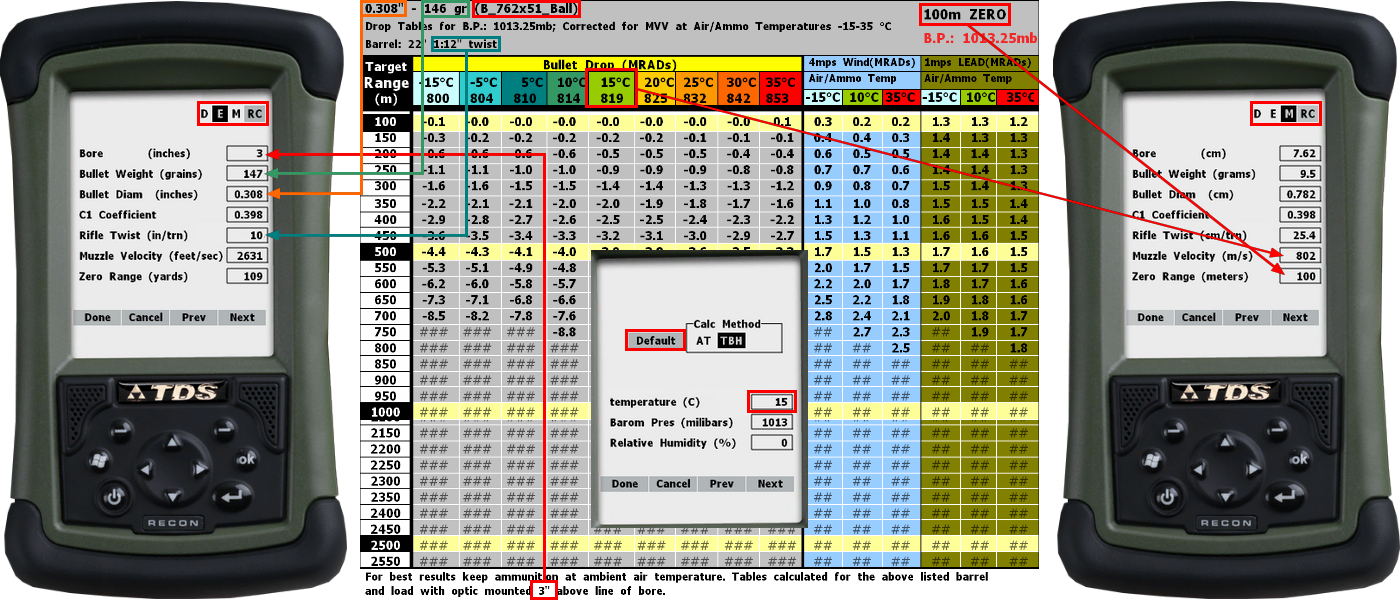
- Open the AtragMx and the
Atmsphrcolumn, selectDefaultandDone. Open Gunthe 7.62x51mm M80 in theGunList.- Select
E(English unit) at the top right. - Open the
Guncolumn, check and update theBore (inches),Bullet Weight (grains),Bullet Diam (inches),Rifle Twist (in/trn)andDone. - Select
M(Metric unit) at the top right. - Open the
Guncolumn, check and update theMuzzle Velocity (m/s), theZero Range (meters)andDone.- Muzzle Velocities (
Options/Muz Vel table) may need a manual update according to the range card.
- Muzzle Velocities (
- Verify that the set
C1 Coefficient(also referred to as G1) is that of the desired ammunition:- It can be viewed in the ACE Arsenal as a magazine stat, or with a Config Viewer (both may list G7, which has to be converted to G1).
- The AtragMx’s
GunListcomes pre-configured with theC1 coefficientof vanilla weapons and their ammunitions. - More information about C1 and how to convert it: Example with
Add New GuninGunList.
- Check
Elev= 0 withZR=TR(if not, openGuncolumn andDone). - Optionally,
Save GunandDonein theGunList.
In position:
- Update the
Atmsphrcolumn andDone. Requirement: Kestrel 4500. - Check the new
Muzzle Velocityin theGuncolumn. - Update the
Targetcolumn andDone. Requirement: Wind arrow, Protractor, Map Tools. For advanced tools: ACE3 Equipment.Latitude: ACE3 Github or Eden Editor’s Extended Debug Console: Watch:ace_common_maplatitude.Dir of Fire (deg from N): The value is therefore given as the direction of the barrel axis from true north. [Horus manual p.14]Wind speed (m/s): Two wind speed values (low and high) may be entered on the target screen,[…] Lead/Wind2 button on the screen. [Horus manual p.32]- Wind takes into account geographic location, season, time of day, obstacles, altitude and surface roughness: Wind Profile.
Wind Direction (clock): Wind Direction is expressed in clock points.[…], wind is always described in terms of where it is coming from. [Horus manual p.16]Inclination Angle: The degrees field is marked with a “d” and the cosine field with a “c”. [Horus manual p.33]Target Speed: Target Speed Assist [Horus manual p.21]Target Range (meters): Parameter Limits minimum and maximum values: 25 - 3700 meters. [Horus manual p.17]
- Apply vertical (Page Up and Down keys as default) and horizontal (Left Ctrl + Page Up and Down keys as default) elevations to the scope.
- Hold Breath (Left Shift as default) and Fire (Prim. Mouse. Btn. as default).
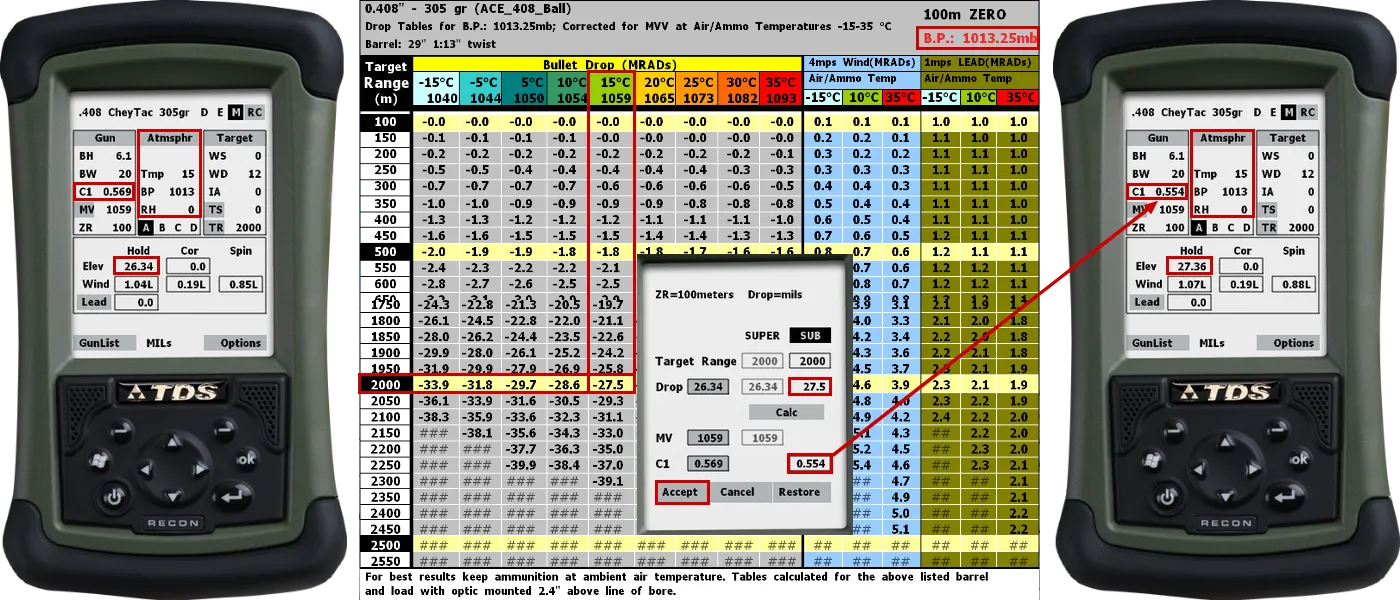
3.3 Example with Truing tool
This process is called “Truing Drop”, or simply “Truing”. It involves taking 2 or 3 real flight data points (finding bullet drop at 2 or 3 places along its flight) and feeding it into the calculation parameters. [Horus manual p.23]
The Truing Drop function is opened from ATrag’s main screen by selecting “Options” […], then selecting “Truing Drop” from the menu that appears. [Horus manual p.23]
With C1, you can also insert the new BC into the C1 table (with the target range value), or you can replace the C1 table with the following values:
- first entry: Zero Range, original C1.
- second entry: range at 75% of distance between transonic start and subsonic start, with original C1.
- third entry: range 200 (y/m) beyond subsonic start, with new calculated C1. [Horus manual p.24]
- Basic example with ammunition 7.62x51mm G7 ballistic coefficient.
- Open the AtragMx and the
Atmsphrcolumn, selectDefaultandDone. Open Guna custom profile in theGunList.- More information about custom profile: Example with
Add New GuninGunList. - Check
Elev= 0 withZR=TR(if not, openGuncolumn andDone). - Open the
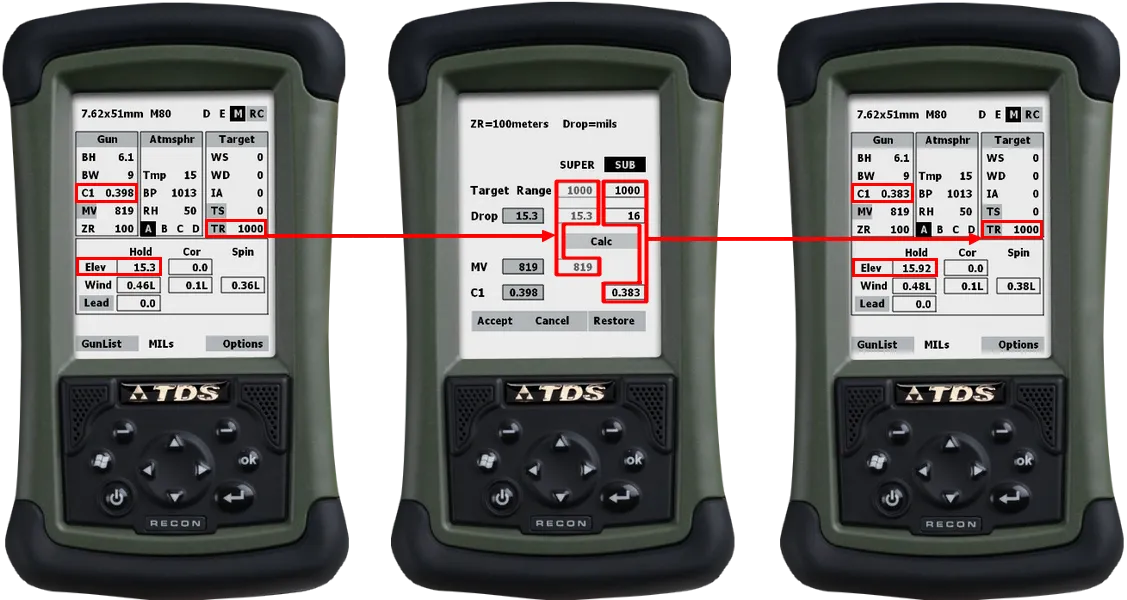
Truing Dropin theOptionsmenu. - Add the actual
Target Rangein theSUPERcolumn andCalc. - Add the same
Target Rangein theSUBcolumn andCalc. - Apply the actual scope elevation in the
Dropfield andCalc. Acceptthe newC1,Guncolumn andElevare updated.- C1 Ballistic Coefficient vs. Distance Interpolation Table (
Options/Drag Coef Table) will be updated. - Optionally,
Save GunandDonein theGunList.
- Open the AtragMx and the
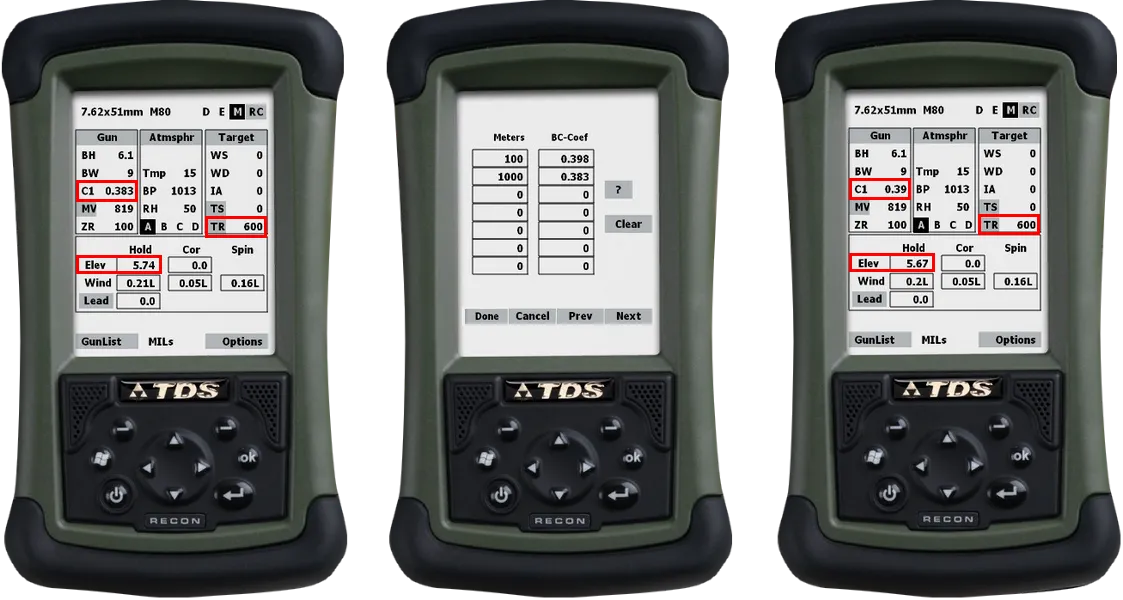
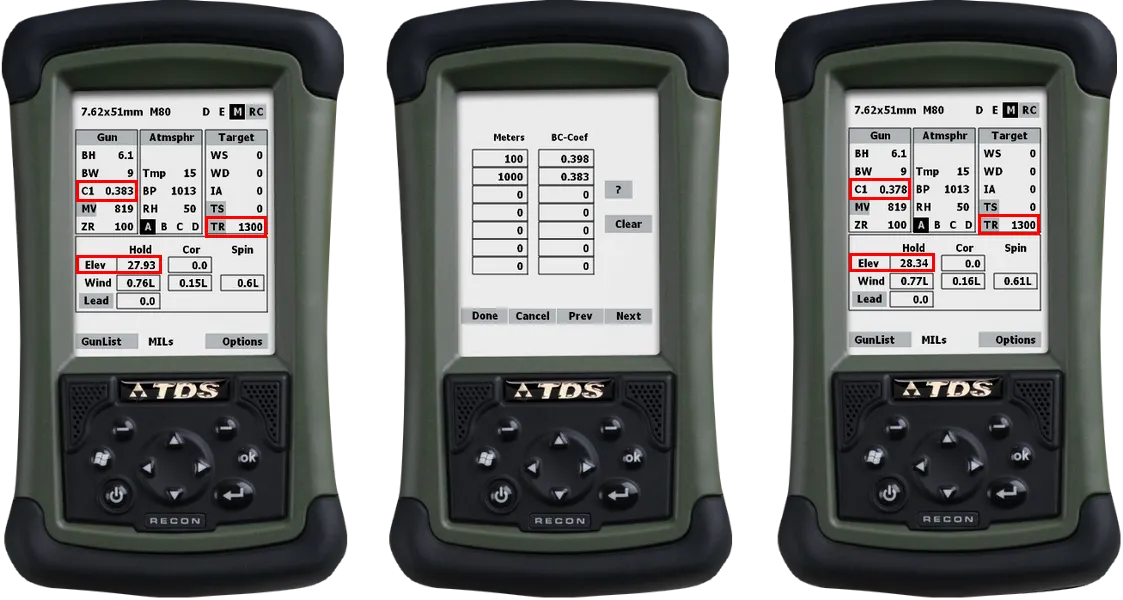
- If a new
Target Rangeis applied in theTargetcolumn, the ballistic coefficientC1and the elevationElevwill be recalculated.
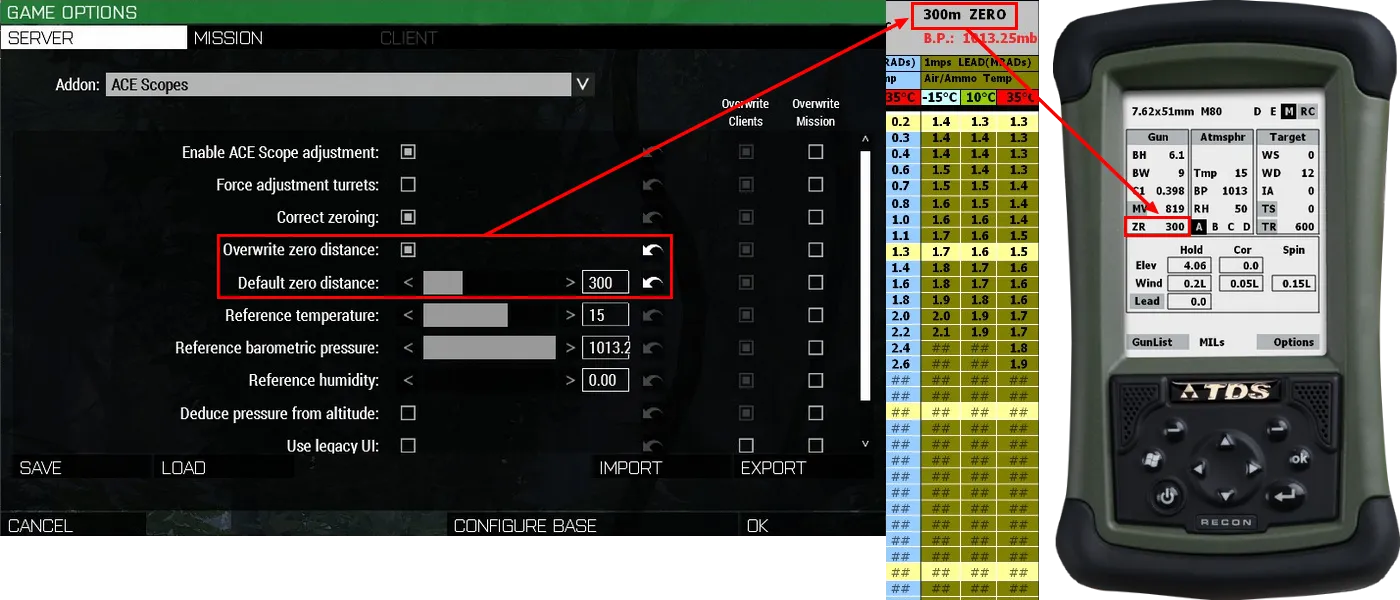
3.4 Example with overwritten zero distance
- The
Default zero distancecan be overwritten with the Scopes Options, the Scopes Framework or the CBA Settings System. - In this case, the Range Card will be updated, NOT the AtragMx.
- Open the AtragMx and the
Atmsphrcolumn, selectDefaultandDone. - Open the
Guncolumn, check and update theZero RangeandDone. - Check
Elev= 0 withZR=TR(if not, openGuncolumn andDone). - Optionally,
Save GunandDonein theGunList.
3.5 Example with Add New Gun in GunList
- Open the Range Card and check the ammunition’s: bullet Class Name, bullet diameter, bullet weight, rifle twist, muzzle velocities, zeroed distance and bore height.
- Open the AtragMx and the
Atmsphrcolumn, selectDefaultandDone. - Select
Add New Gunin theGunList. - Add a
New Gun NameandOpen Gun. - Select
E(English unit) at the top right. - Open the
Guncolumn, check and update theBore (inches),Bullet Weight (grains),Bullet Diam (inches),Rifle Twist (in/trn)andDone. - Select
M(Metric unit) at the top right. - Open the
Guncolumn, check and update theZero Range (meters)andDone. - Open the
Muz Vel Tablein theOptionsmenu or click onMVin theGuncolumn. - Manually edit the
Muzzle Velocity Tableaccording to the Range Card andDone. - Input the
C1 coefficient(also referred to as G1) of the bullet, which can be found in two different ways:- in the ACE Arsenal, as a stat on a selected magazine that lists the bullet’s ballistic coefficient and drag model (G1 can be used directly, while G7 requires conversion).
- with the Eden Editor’s or Debug Console’s
Config Viewer, which lists the BC and DM respectively, under the following paths:
configfile » “CfgAmmo” » “bullet Class Name” » “ACE_ballisticCoefficients”
configfile » “CfgAmmo” » “bullet Class Name” » “ACE_dragModel”
- Check
Elev= 0 withZR=TR(if not, openGuncolumn andDone). - Optionally,
Save GunandDonein theGunList.
Note: The AtragMx accepts only C1/G1 ballistic coefficient. It can be calculated by using the 360 Degree Training Course mission as a chronograph at different distances and JBM Ballistics Calculators for example, another ballistic software at your own convenience, or the AtragMx Truing Tool.
If only G7 ballistic coefficient is listed, it must be converted to G1, for example with the online JBM Ballistics Calculators.
Example direct conversion with .408 Cheytac 305 grains, G7 BC 0.279 at 2000 meters, ICAO conditions (15°C, 1013.25hPa, 0%):
3.6 Connecting AtragMx with Vector 21 and DAGR
- Requirement: Vector and DAGR.
- Open the self interaction menu Ctrl + ⊞ Win.
- Select
Equipment. - Select
Configure DAGRandCONNECT TO(DOWN and HELP/SEL)Vector 21(HELP/SEL). - Equip and use the Vector (B key as default).
- Check target’s slope distance and azimuth (hold both R and Tab keys as default).
- Open the AtragMx properly configured before according to current rifle and ammunition.
- Open the
Targetcolumn:Dir of Fire (deg from N),Inclination AngleandTarget Range (meters)updated with Vector’s values.
3.7 Adding AtragMx Presets
Scope Base Angle value:
- Open the AtragMx and the
Atmsphrcolumn, selectDefaultandDone.Open Gunthe custom profile (with an arbitrary scope base angle) in theGunList.- Check
Elevvalue withZR=TR.- Open the
Guncolumn andDone.- Execute
copyToClipboard Str(ace_atragmx_workingMemory select 3);[LOCAL EXEC] with the Eden Editor’s Extended Debug Console.- Paste new value to the
preset.- After new test, check
Elev= 0 withZR=TR.
3.7 Reseting AtragMx GunList
- Open the Eden Editor’s Extended Debug Console.
- Execute
call ace_atragmx_fnc_clear_user_dataorcall ace_atragmx_fnc_initGunList[LOCAL EXEC], (RESTARTeventually needed). - The original ACE3
GunListwill be restored (allAdd New Gunentries deleted).
3.8 Example with AtragMx and default ballistic (M14, 7.62mm 20Rnd Mag)
Note: ACE3 has two external ballistics, the vanilla default ballistic (enabled as default) and the Advanced Ballistics (must be enabled). The ACE3 default ballistic doesn’t take atmospheric conditions (except wind), powder temperature, rifle twist and Earth effects into account. The AtragMx will need for
Guncolumn:Bore,C1 Coefficient,Muzzle VelocityandZero Range. WithTargetcolumn,LatitudeandDir of Fireare useless.Atmsphrcolumn must not be updated.
Start of the mission:
- Open the Range Card and check the ammunition: bullet Class Name, muzzle velocity, zeroed distance and bore height.
- Open the AtragMx and the
Atmsphrcolumn, selectDefaultandDone. - Select
E(English unit) at the top right. - Open the
Guncolumn, check and update theBore (inches)andDone. - Select
M(Metric unit) at the top right. - Open the
Guncolumn, check and update theMuzzle Velocity (m/s), theZero Range (meters)andDone. C1 coefficientof the bullet =airFriction x -1000.airFrictioncan be found with the Eden EditorConfig Viewer:
configfile » “CfgAmmo” » “bullet Class Name” » “airFriction”
- AtragMx is configured with
C1 coefficientaccording to vanilla weapons and its ammunitions inGunList. - Spin drift and Earth effects not taken into account,
Options/Show Corioliscan be disabled. - Check
Elev= 0 withZR=TR(if not, openGuncolumn andDone). - Optionally,
Save GunandDonein theGunList.
In position:
- Do not update the
Atmsphrcolumn. Default ballistic doesn’t take into account temperature, pressure and humidity. - Update the
Targetcolumn andDone. Requirement: Wind arrow, Protractor, Map Tools. For advanced tools: ACE3 Equipment.Wind speed (m/s): Two wind speed values (low and high) may be entered on the target screen,[…] Lead/Wind2 button on the screen. [Horus manual p.32]- Wind takes into account geographic location, season, time of day and obstacles.
Wind Direction (clock): Wind Direction is expressed in clock points.[…], wind is always described in terms of where it is coming from. [Horus manual p.16]Inclination Angle: The degrees field is marked with a “d” and the cosine field with a “c”. [Horus manual p.33]Target Speed: Target Speed Assist [Horus manual p.21]Target Range (meters): Parameter Limits minimum and maximum values: 25 - 3700 meters. [Horus manual p.17]
- Apply vertical (Page Up and Down keys as default) and horizontal (Left Ctrl + Page Up and Down keys as default) elevations to the scope.
- Hold Breath (Left Shift as default) and Fire (Prim. Mouse. Btn. as default).
4. Official References
5. Resources
Missions by Ruthberg, author of Advanced Ballistics and its tools:
- Arma3 Missions folder: 360 Degree Training Course v1.3, Features
- Eden Editor mission: 360 Degree Training Course Framework